Hello Everyone! Today, we will continue talk about 【Light.vn】 - a japanese visual novel engine.
Following up on my last post, today we'll delve deeper into light.vn's text display features. In addition to showing basic text and dialogue, we'll explore:
- Light.vn's Multilingual Function
- Using Different Types of Textboxes
- Alternative Dialogue Modes
- Text Transformation and Animation
- Advanced Commands Beyond the Basics
Since it is marked as "Advanced," you can skip this tutorial but still do many things in light.vn. However, if you want to explore the full potential of this visual novel engine, then just keep reading!
Command "wait"
In most visual novels:
- The text appears one sentence at a time.
- You or the reader, need to click or press a key to see the next sentence
And by default, it automatically waits for you to finish reading a sentence before showing the next one. This happens whenever it sees a blank line in the script.
Here's how it works:
- When light.vn sees a blank scenario line, it knows it's a break and waits for you to continue
If you want it to wait after a specific line:
- Just add the symbol "「\w」" (without the quotes) at the end of that line
- This tells light.vn to pause after displaying that text
And you can even have more control
- You can directly use the "wait" command itself
- For example:
~waitSo now you have created a pause!
Key points:
- light.vn automatically waits after blank lines
- You can use "「\w」" or "〜wait" for specific pauses
- This lets you control the flow of text in your visual novel
Command "textAutoWait"
- With this command, you can set the default auto wait feature
And there are 3 types of 「textAutoWait」, you can use:
- 0: don't use it (Turn off this feature)
- 1: auto waits on each scenario line
- 2: auto waits on each blank scenario line
If you turn on this feature, then you can save the time to write 「\w」 or「wait」!
Command - \n for "new line"
Also, I'd like to talk about the \n command.
If you've used Ren'py before, you might already know what this is for.
- Sometimes you want a sentence or text to start on a new line
- In Ren'py, we use the
\ncommand for this, and light.vn uses the same command ~ - So, there's nothing new to learn here!
CTC Button / Click to Continue Icon In Light.vn
I'd say it is much easier to add a CTC Button / Click to Continue Icon in light.vn than in Renpy
Here's how to add a CTC Button / Click to Continue Icon in light.vn:
textWaitIcon [0/1] [filename / animation name] [x] [y]Explanation:
- Choose between "0" and "1":
- 0 (default): Relative to the last character in your sentence
- 1: Relative to the textbox top left point
- Specify the filename (path to your image) or animation name.
- Set "xpos" and "ypos" (the position of the image / animation).
Example:
textWaitIcon 1 sys_wait_icon 800 60In this case, the CTC button's position is:
- Relative to the textbox top left point (because of "1" at the beginning)
- We use the file called "sys_wait_icon" as our image
- And it's positioned at "xpos 800" and "ypos 60"

Translation / Multi-Language
Personally, I think Ren'py offers a fairly easy way to implement multilingual functionality. In fact, it's the easiest visual novel engine I've used for that purpose. Anyways, let's see how light.vn handles multiple languages!
- We create a CSV file firstly
We can create a CSV file to store our translations. Here, we define the languages we want to use and their corresponding translations
Example:
jap,kor,eng
ラムは有能なのだ。,람은 유능하다.,Lam is precious.
パンをあげよう。,람에게 빵을 주자.,Let's give Lam some bread.
As you can see, the first line lists the languages: Japanese (jap), Korean (kor), and English (eng). The subsequent lines provide the translations for each language.
Once we have the CSV file, we can use light.vn commands to import and display the translations.
Setting the Default Language:
We use the textTableColumn command to set the default language that displays first.
textTableColumn jap- In this example, we set Japanese as the default language.
Load / Call Translation File:
We use the 「textTableLoad」 command to load the CSV file and specify the starting line for reading the translations.
Here's how to call / load the csv file:
textTableLoad [filepath] [next line to read]Explanation:
- First, we specify the file path to your CSV file.
- Then, we tell light.vn which line to start reading from:
Here's an example:
textTableLoad csv/language_test.csv 0In this example:
- We load a file from the "csv" folder called "language_test.csv".
- We tell light.vn to start reading the translations from the first line (line 0).
Show The Text:
We use this command 「textTableLine」
Example:
textTableLine csv/language_test.csv- It displays the next row in your csv file as a new page text
Full Example:
CSV File:
zh,eng
安安,Hi!
今天過得怎麼樣?, How's your day?
Showing Text:
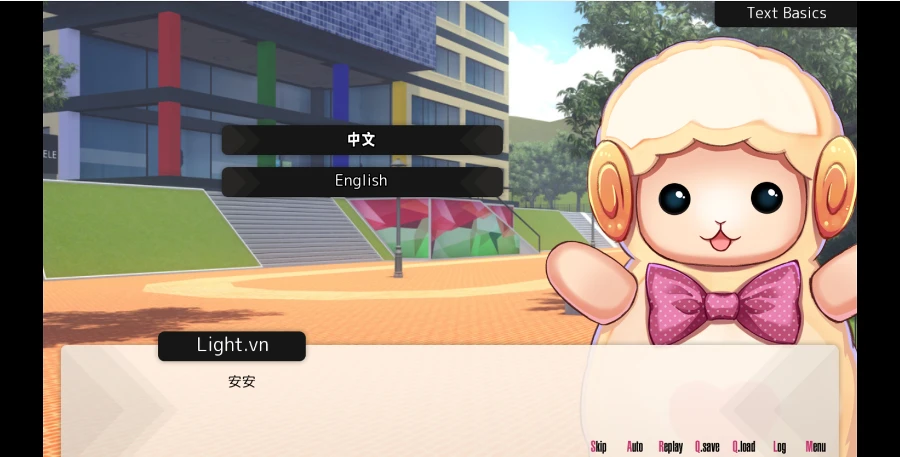
textTableColumn zh
textTableLoad scenario_tables/test.csv 0
~【Character Name】
textTableLine scenario_tables/test.csv
Quick Explanation:
textTableColumn zh: Set the default text display language to ChinesetextTableLoad scenario_tables/test.csv 0: Load the "test.csv" file from "scenario_tables" folder, starting from line 0~【Character Name】: Display the character name in the name boxtextTableLine scenario_tables/test.csv: Show the text from the loaded CSV file
And it'd look something like this:
Use Multiple Textbox in Light.vn
I guess I dont have much talent in textbox thing. Also in renpy, I spent long time to get it right to use multiple text as well as in light.vn >.<
I think its not the engine's problem but just i'm too uncompentence QAQ
But I get it now, so let me tell you how to use multiple textboxes here in light.vn
Defining Textboxes:
There are two ways to define textboxes in light.vn:
- In a Text File (textbox.txt or any other .txt file):
This method is useful for pre-defining textboxes you'll use throughout your project.
Here's the command to create a new textbox:
textbox [name] [x] [y] [layer] [width] [height] [font filename] [font size]Explanation of Parameters:
- name: Give your textbox a unique name (e.g., "my_custom_textbox").
- x/y: Set the position of the textbox
- layer: Specify the layer where the textbox should be displayed (e.g., in front of or behind character sprites or other elements)
- width/height: Define the size of the textbox
- font filename: Specify the font file to use for the text in the textbox
- font size: Set the size of the text displayed in the textbox
Example:
textbox0 my_custom_textbox 220 500 400 1921 334 rounded-mplus-1c-regular.ttf 22 on_cameraUsing Textboxes in Your Story:
Once you've defined a textbox, you can use it in your story script with the 「useTextbox」 command:
useTextbox my_custom_textboxAdding Backgrounds:
You can then add a background image to your custom textbox using the 「textboxSkin」 command:
textboxSkin [filepath] [x] [y]
Adding Text Styles:
While the basic setup works (you don't really need the things below), you can add more style to your custom textbox using additional commands like:
textColour- Change the text color and opacitytextLineSize- Set the line spacing between text linestextSize- Adjust the font size for the texttextFont- Specify a different font file for the text- etc.
Example with Styles:
textColour #fbe0e0 20% #d7f9f8
textLineSize 50
textSize 35
textFont myfont.ttf
fadein my_custom_textbox 300
Limitations and Multiple Use:
Through my testing, I found that textboxes defined this way cannot be reused throughout your project. To create a reusable textbox, you'll need to define it within a "bookmark" (similar to Ren'py's "label") and call it using that bookmark name. However, the method described here is perfect for creating unique, one-time-use textboxes.
Full Example
Here's a full example, which you can ex. copy and paste to your project to test this function
~textbox0 my_custom_textbox 220 500 400 1921 334 myfont.ttf 22 on_camera
useTextbox my_custom_textbox
textBold true
textShadow 1 2 0 0 0 200
textboxSkin textbox.png -530 -50 75%
textColour #fbe0e0 20% #d7f9f8
textLineSize 50
~fadein my_custom_textbox 300
textSize 35
"【<ruby 微笑花>SmileFlower</>】
~textColour #eac4d5 70% #7593af
textSize 30
-".What's your name?
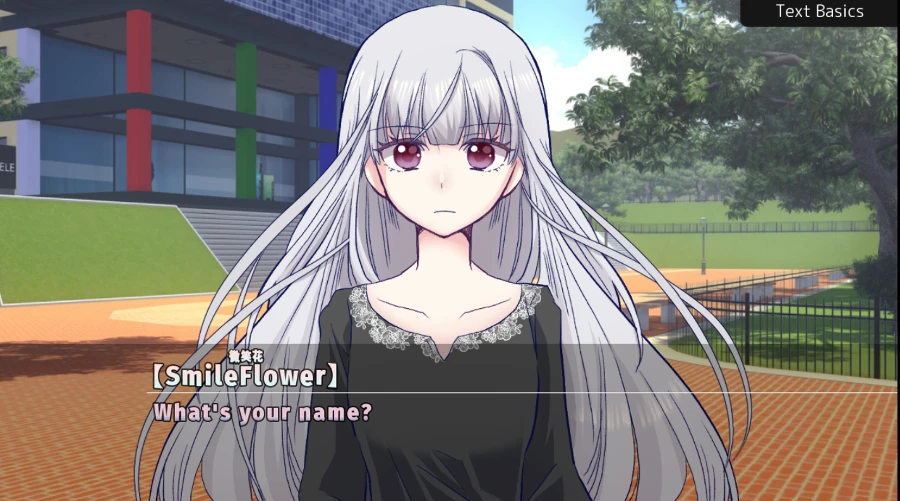
You need to change "myfont.ttf" to your own font and add "textbox.png" to your project to run it properly! Otherwise, you might get a error message!
Also, if you want to know more about custom textbox, you can check the sample project ("tut_text.txt"). There you will get more information and examples!
Text Transformation / Animation
Now, we have come to our next topic: 【text transformation / text animation】!
First, let's start with a simple one - Moving text!
"move" Command
The command to do this is simply called 「move」
move [type/target name(s)] [x] [y] (time(ms)) (acceleration: a0~a18)There are two types of movement:
move: Sets the new position for the target.move2: Adds to the current position of the target.
If you type “move,” the target you set will move to the position you specify.
On the other hand, if you type “move2”, the position of the target you move to the new position ("xpos" or "ypos" will be added to its original position so you will get a new position.) This results in a visible transformation from position 1 to position 2.
Example:
text0 item1 100 0 99 .ttf 100 "Text"
move2 item1 100 0 500
In this case, because we used move2, the x position will increase by 100. So the item will move to xpos 200, ypos 0.
Another example:
text0 item1 100 0 99 myfont.ttf 100 "Text"
move item1 100 0 500- Here, there will be no visible change because we used
moveto set the position to the same position it already had (xpos 100, ypos 0).
Example:
- Sprite downloaded from Itch.io
Another thing I didn't mention before about the move command is that you can actually control how it moves. Similarly, with rotate, you can control the rotation animation with 19 (a0~a18) available options.
Unfortunately, the video showcasing all 18 options seems unavailable, including the one on the light.vn wiki. However, I've recorded it for reference. If you're interested, feel free to check it out.
"rotate" Command
- similar like move, you have 「rotate」 and 「rotete2」
And you can do something like this:
loop 1 rotate t0 360 800  a2
loop 1  rotate t1 360 800 a5
loop 1 rotate t2 360 800  a14
loop 1 rotate t3 360 800 a13
Also, I added the loop command before the rotate command so it will continuously rotate.
And this is today's post! In next post, I'll talk about more feature in ligh.vn~
In the meantime, feel free to check our old posts!


[…] Renpy To Light.vn Tutorial / Compare Command【Advanced #005】 - Text Tag […]
[…] Renpy To Light.vn Tutorial / Compare Command【Advanced #005】 - Text Tag […]
[…] Renpy To Light.vn Tutorial / Compare Command【Advanced #005】 - Text Tag […]
[…] Renpy To Light vn Tutorial / Compare Command【Advanced #005】 - Text Tag […]