Hi everyone! I'm Buchalatte, and I've been really interested in Light.VN for a while now. Great news – it finally has an English version!
This post is for anyone who's new to Light.VN, or for those who use Ren'Py and are considering switching engines.
Today's post will break down which Ren'Py tags correspond to their Light.vn equivalents, and how to use them in Light.vn.
Let's dive in!
Label ▶ Bookmark
In Ren'Py, we use labels to mark specific points in the story. This lets us easily jump to those points whenever needed, like grouping dialogue for better organization. Light.VN doesn't require a "label start", and its equivalent to labels is called 「bookmark」, which functions similarly.
In light.vn it also has a command called 「jump」 which can jump between different 「bookmark」
Scene Background ▶ bg
Now how to show background image in light.vn?
-> you can use the command 「bg」
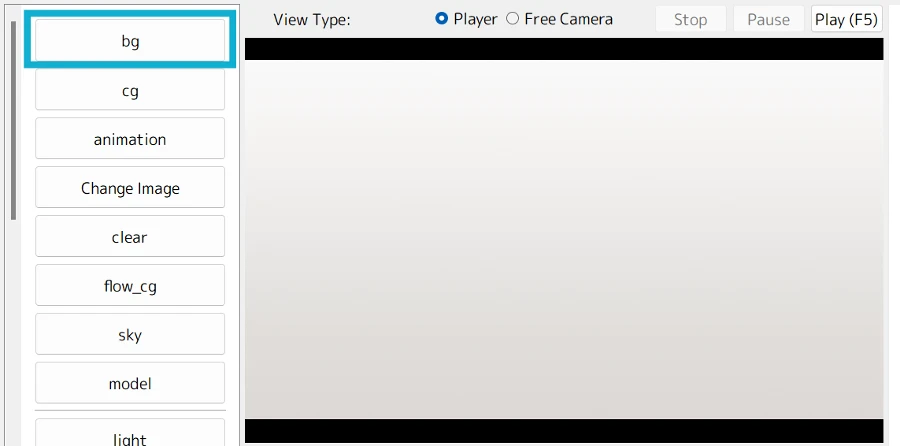
- After clicking the button, a new folder will open.
- This folder will display all the images in your "bg" folder (where you'll need to place the images you want to use)
- Just double-click the desired image, and the code will automatically appear in your script:
~bg0 id0 bg/yourfilename.png | .fadein id0 300- You can add subfolder to bg folder or your file name might be different so the code is not exact the same like this example
Important note: For the background image to actually appear in your game, you'll need to add .fadein after the bg command. Without .fadein, the image will be loaded but won't be visible.
Show Character Sprite ▶ cg
- Its very similar to how you show a background image
- In Light.vn, the command for character sprites is called 「cg」
- Just double-click the 「cg」 button, select the character image you want to use, and then choose its position on the screen
- That's it! The corresponding code will appear in your script, and the character image will be displayed on the screen.
- If your image size is too big or too small, you can conveniently use the 「zoom」 command to resize it
- The Live preview on the side / middle of the screen lets you see the image adjustments in real-time.
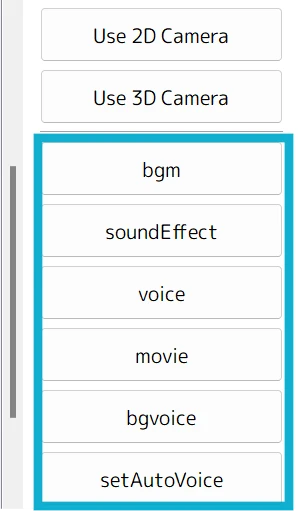
Play music ➡️ bgm
- Adding background music is also very easy!
- Just like other commands, you'll find the 「bgm」 button on the left sidebar.
- Simply click it, choose the music file you want to play, and voila!
- The corresponding code will appear in your script on the right side.
Light.vn lets you also play other audio elements beyond music. You can also use it for voice and sound effects.
Show dialogue
It's a little bit complex compared to Renpy.
While Ren'Py allows you to simply type a character tag and text within quotes to show dialogue, Light.vn requires calling the 「textbox」 command first. This might seem fine when working with sample projects, but its somehow very confused when creating a new project from scratch.
A completely new Light.vn project starts with a blank canvas. Unlike Ren'Py's basic setup, you'll need to build all user interface elements yourself, including the title screen, save/load, preferences, and also, the textbox. This can be overwhelming and very difficult for beginners.
Both the 「text」 and 「textbox」 commands seem identical when you click on them. This is because they currently have the default appearance. To create a more textbox like textbox, you'll need to customize it further.
In my experience, building everything from scratch can be confusing and time-consuming. I recommend starting with a Light.vn sample project and customizing it to your liking.
So how to show dialogue?
- Choose a textbox (if you are using sample project, then you can use 「textbox_bottom」)
- Write Name of the Character (if you don't need then, you can ignore this) -> use this -> ~【Name】
- Write your dialogue, it should beginn with -> "
Example:
~textbox_bottom

~【???】
"・・・・・・- textbox_bottom: textbox we use to show the text
- ???: is the name
- ・・・・・・: is the text shows inside textbox
(the code is copied from the sample project)
-> More information about showing dialogue will be explaned in next post!
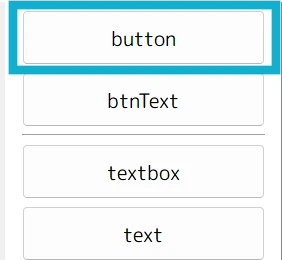
Menu ➡️ button + btnText
This is also a little more complex than Ren'py
Creating Choices / branches:
While Ren'Py uses the menu: command to display choices for players, Light.vn has a different approach.
Adding a Background Image:
Light.vn allows you to set a background image for your choice. There are two ways to do this:
- Using the Button:
- Click the button on the left sidebar.
- Select the background image you want to use.
Note: This method only add the idle image path to the script right side. You'll need to manually write the hover and selected image paths using the file path method (explained below) if you want those version
- Using File Paths:
- Type the command
touchableRes[idle file path] [hover file path] [selected file path].
- Type the command
touchableRes [idle image] [hover image] [selected image]
button [id / tag name of this button ] [position of this button] [action]
Adding Text to the button:
Now that you've set a background image, it's time to create your choices / add text on it!
You can 1. click on the button left side 「btntext」and choose the font you want to use or you can write something like below direct into your script file on the right side.
Here's an example:
btnText [button name] [font filename] [font size] "Some Text"
- There're many more things you can define but they will be covered in the following posts!
Pause ➡️ wait
Adding Pauses Between Actions and Dialogue
Light.vn, similar to Ren'Py, allows you to add pauses between actions or dialogue using the 「wait」 command. There are different ways to use this command:
- Specify a Duration: You can directly define a waiting time in seconds, like "pause 3" for a 3-second pause and in Light.VN its 「wait 300」 for a 3-second pause
- Enforce Uninterruptible Pause: To create a pause that the player cannot skip, you use "hard=True" in Renpy and in Light.vn, its called 「続行禁止」(sorry I didn't find the english command for it)
- Wait till movie finishes playing: In light.VN, you can use this command to do it 「movieFin」
There are more types of waits available in Light.vn. If you're interested, you can check them out in their official documentation (link is attached below)
Final: Ren'py Command ➡️ Light.vn Command
To make everything clear, I've made a list / table here to compare between each command from renpy to Light.VN:
| Renpy | Light.vn |
|---|---|
| label | bookmark |
| jump | jump |
| scene XX (background) | bg |
| show XX (character sprite or other item) | cg |
| play music play sound play voice | bgm soundEffect voice |
| dialog | 1. choose textbox 2. use ~【】to show name 3. use " to show text |
| menu | 1. touchableRes 2. button 3. btnText |
| pause | wait |
So here's the second episode of this series, next post I'll talk dialogue in detail. So if you're interested in this visual novel engine, don't forget to follow our site!

[…] Renpy To Light.vn Tutorial 【Basic #001】 […]
[…] Renpy To Light.vn Tutorial 【Basic #001】 […]
[…] Ren'py To Light.vn Tutorial 【Basic #001】 […]
[…] Renpy To Light.vn Tutorial 【Basic #001】 […]
[…] Renpy To Light.vn Tutorial 【Basic #001】 […]
[…] Renpy To Light.vn Tutorial 【Basic #001】 - YoruBox […]
[…] Renpy To Light.vn Tutorial 【Basic #001】 - YoruBox […]