Hello and welcome to another Ren'Py tutorial for beginners!
Today, we'll delve deeper into the Ren'Py launcher. We'll explore what it offers, the functions of each button, and their purpose.
Ren'py Launcher
If you've successfully downloaded Ren'py, you can open the launcher by double-clicking the .exe file
Here, I'll break it down into eight different areas and explain their functions.
1. Renpy launcher functions and purpose
Let's break down the renpy launcher's functions and purpose
Here's what the launcher screen typically looks like:
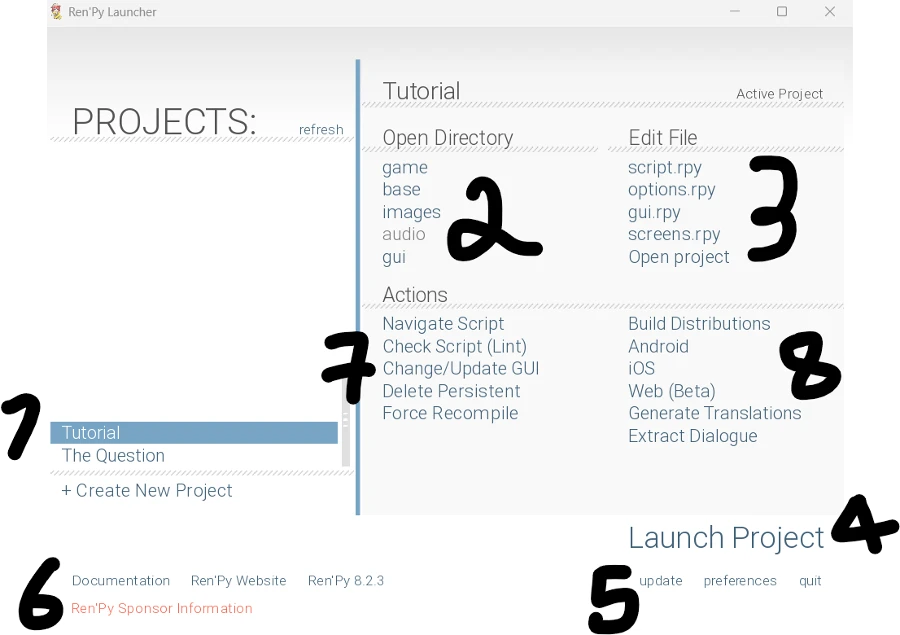
Under "Project" are all of your Renpy projects.
To make a project appear, make sure you've placed your Ren'py projects in the correct folder!
If you've confirmed that your project is in the Ren'py folder but it's not showing up in the Project list, you can click the refresh button.
1. "Create New Project"
- You can use this to create a new project! For more information, see the page Creating a New Renpy Project. (will coming soon!)
2. "Open Directory"
- Clicking any button under "Open Directory" will open the corresponding folder in your file explorer
3. "Edit File"
- Clicking any button under "Edit File" will open the corresponding file in a code editor (like Atom or visual studio code, if you want to change default editor, it's also very easy and I'll show it later)
- Clicking "Open project" will open the entire renpy project (it's what I usually do)
4. "Launch Project"
- Use this to preview your project
5. The row below "Launch Project"
- "Update" - Check for renpy updates. You can choose whether to update to the latest stable version or the development version
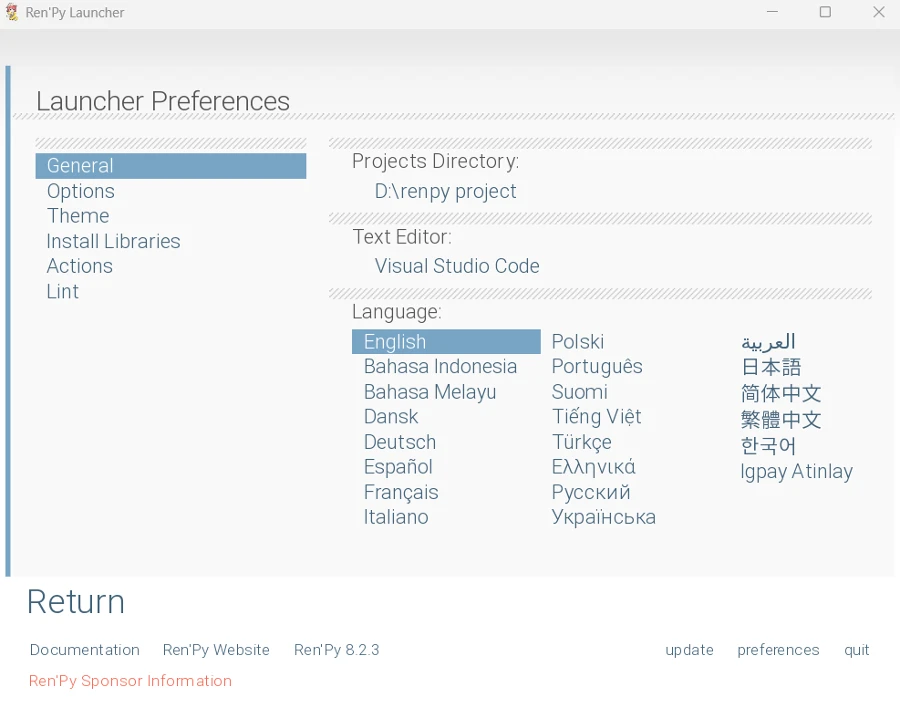
- "Preferences" - Opens the launcher preferences and you can set things like:
- Choose Ren'py language - This will also affect the language of new projects
- Change the launcher default editor (if you already had one visual studio code then you can pick your system one or install a new one or use other editor)
- Choose the launcher theme (light / dark or custom -> this tutorial will also comming soon!)
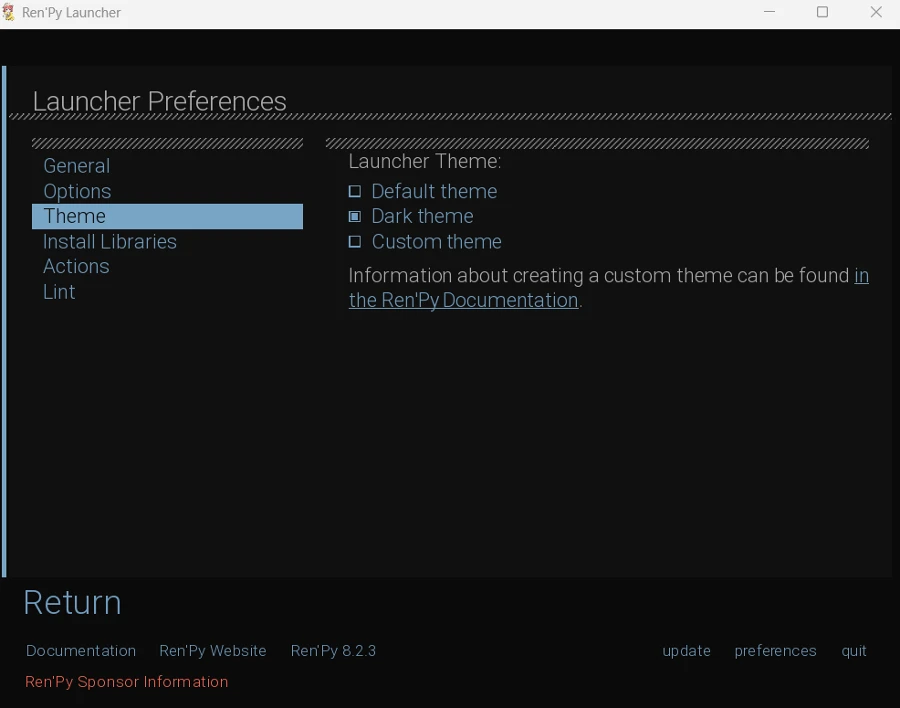
- "Quit" - Closes Ren'py Launcher
6. The row in the bottom left corner
- "Documentation" - Click to open the official documentation
- "Ren'Py Website" - Click to open the official website.
- "Ren'Py + Version" - Shows Ren'py's version and license.
7. "Actions" on the left side
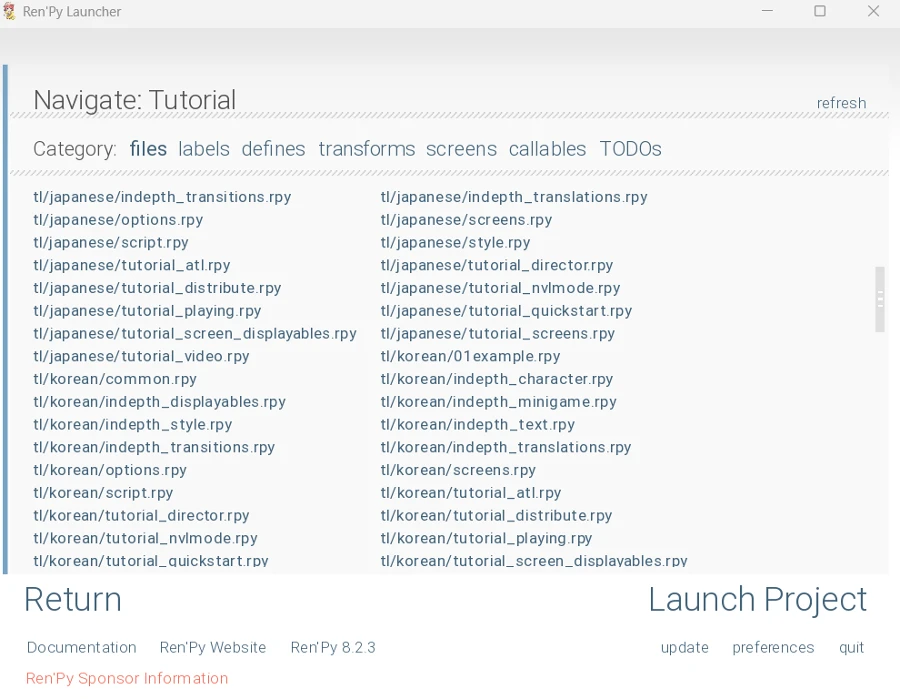
- "Navigate Script"
- "File" - You can use it to:
- Search for files
- Open files
- Create files
- "Labels":
- Lists all labels (and the files they're in) under the "Labels" tab
- You can quickly jump to the selected label by clicking on it
- "Defines":
- Finds all defined things.
- Black font is unselectable = it's the file containing the listed object below
- Blue font is selectable and you can quickly jumps to the line where it is located by clicking it
- All sentences starting with "define" are listed here
- "Transforms":
- Lists all transforms
- "Screens":
- Lists all screens
- "Callable":
- Lists all callable sentences
- "TODO":
- If there is a #todo in your file, the following will be listed
- Example:
- "File" - You can use it to:
# todo: Add background music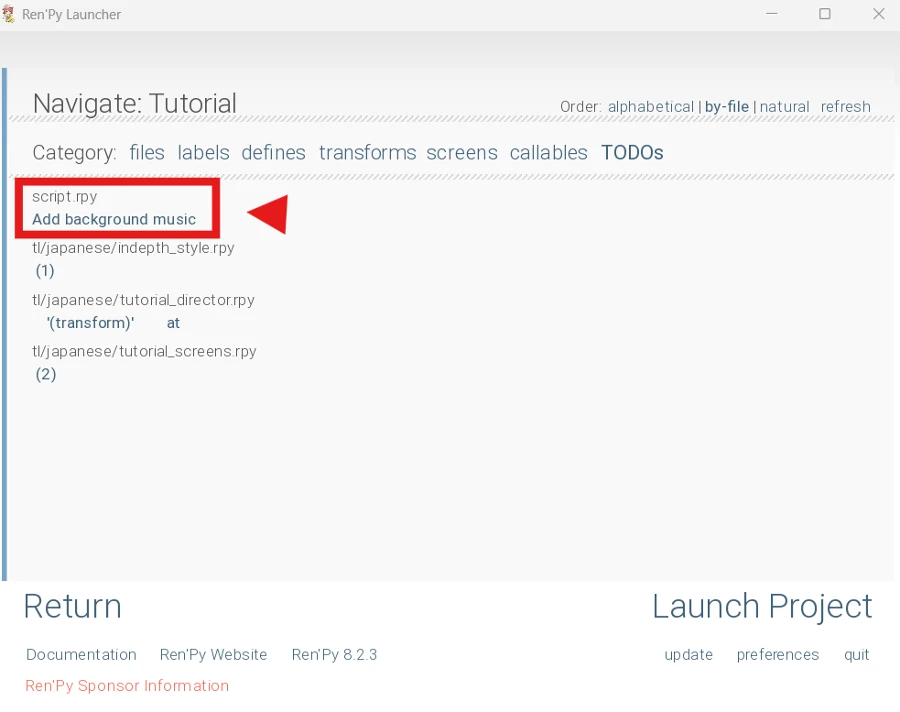
- "Check Script (Lint)"
- You can use it to fix or find errors
- Clicking on it will display something like this:
Ren'Py 7.4.11.2266 lint report, generated at: Wed May 18 11:31:34 2022 Statistics: The game contains 5 dialogue blocks, containing 35 words and 201 characters, for an average of 7.0 words and 40 characters per block. The game contains 0 menus, 3 images, and 23 screens.- The first line will show the current version and the time of execution
- Then it will show your data
- It will show how many dialogues your game has, how many words and characters these dialogues consist of, and it will show the average number of words and characters in each dialogue block.
- It will also show how many menus, images, and screens your game contains.
- "Change/Update GUI"
- You can use this to change/update the game UI colors
- "Delete Persistent Data"
What is persistent data can be seen here(will add this post / tutorial soon!)- And it will delete all persistent data as said
- "Force Recompile"
- Renpy will automatically convert your rpy files to rpyc files when you run the game, but you can also manually use this feature to convert your rpy files to rpyc files
- rpy file = Human-readable file
- rpyc file = Computer-readable file (not human-readable)
8. "Actions" on the right side
- "Build Distributions"
- Use this to build your game (playable file for the player)
Currently you can export to Windows / Mac / Linux.- You can now export to Windows / Mac / Linux and with the button below, you'll have more export option!
- "Android"
- You can release a mobile game (Android) with this.
- You can also use it to simulate the game (phone, tablet and TV interface).
- "IOS"
- It's the same as Android, but for the IOS operating system.
- "Web"
- Release a web version of the game.
- "Generate Translation File"
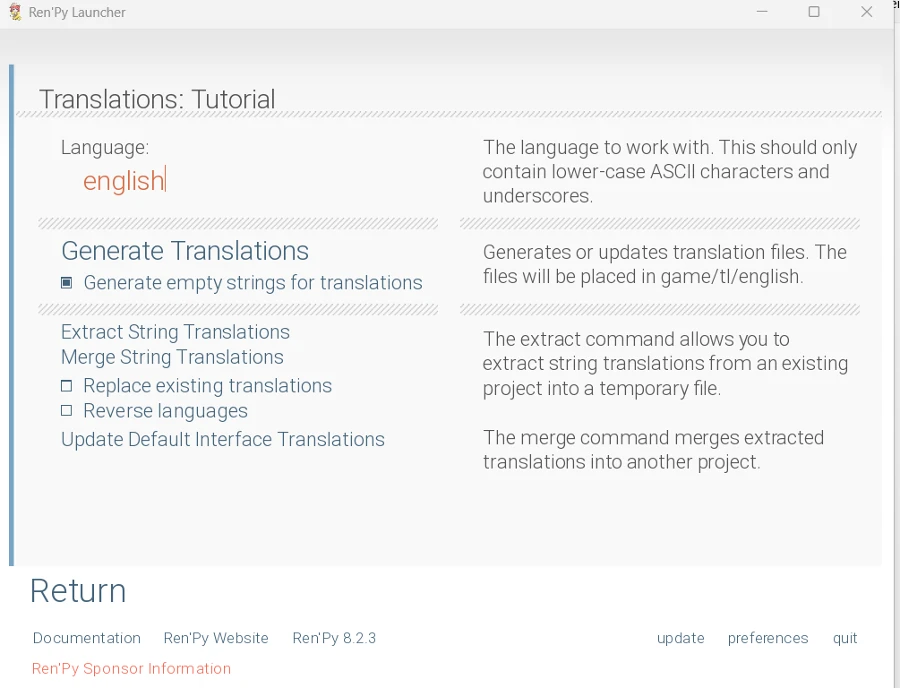
- First, you need to enter the language you want to translate your game into
- After entering the language, you can see the last part of the text in the second row on the right - usually "game/tl/(the name you just entered)"
- That's the path to your translation file.
- The translation file will look something like this:

- This is the translation file generated after selecting "Generate Empty String for Translations"
- If you do not select "Generate Empty String for Translations", the generated translation file will look like this:

For information on how to add language options to your Renpy game, you can refer to this tutorial (will be added soon!)
- "Extract Dialogue": Used to extract dialogue from the game
FAQ: Some Common Questions
Here I will cover some common question I can see online when people first getting start to use ren'py
1. How to change the default language in Renpy?
Typically, if you don't specify a language, your Ren'py project / game will inherit the language you used to create the project.
To change the default language later:
- Open your
options.rpyfile - Find a suitable location you want to insert the following code:
define config.language = "<language code>"- Replace
<language code>with the desired language code
With this method, you should be able to set the default language for your Ren'py game!
2. How to Switch the Ren'Py Launcher Language
To change the interface language of the Renpy launcher, follow these steps:
- Open the Preferences menu. Locate the "Preferences" option in the launcher, typically found in the bottom right corner.
- Navigate to the General Section. Within the Preferences menu, look for a section named "General"
- Select Your Language. In the General section, you should find a "Language" section. Choose the language you want to use from the available options.
3. How to Change the Default Renpy Code Editor?
To change the default code editor used by Renpy, follow these steps:
- Open the Preferences menu. Locate the "Preferences" option in the launcher, typically found in the bottom right corner
- Navigate to the Text Editor settings. Within the Preferences menu, go to the section labeled "General" or look for a setting named "Text Editor"
- Select your preferred editor. You'll see several options:
There you will see the following option:
- Visual Studio Code
- System Editor
- Visual Studio Code (System)
- None
Visual Studio Code: This option will download and install Visual Studio Code for you.
System Editor: This will use your system's default editor. If it's your first time opening Renpy, it might prompt you to choose an editor (like Atom).
Visual Studio Code (System): This will use the existing Visual Studio Code installation on your system, if you have one.
None: Choosing this option prevents Renpy from automatically opening an editor.
4. How to use my existing Visual Studio Code?
I see this question come up sometimes. You might already have Visual Studio Code installed on your system, but you accidentally chose the wrong option when you first opened Ren'Py and downloaded a second copy.
So If you already have Visual Studio Code installed and accidentally selected the wrong option during initial setup, you can still use your existing editor:
- Go to Preferences > General > Text Editor. Choose the "Visual Studio Code (System)" option.
- This will use your existing installation with its themes and extensions
Additional Tip:
Sometimes, you might see two Visual Studio Code windows open when you're trying to opoen a Ren'Py project. This could be caused by unsaved changes in the extra window. Saving any open files should resolve the issue. If you still see two windows opening, you can uninstall the additional (unnecessary) Visual Studio Code installation.
5. The font / text is not displaying properly
Font Compatibility and Text Display
If you encounter text display issues, it might be due to font incompatibility with the language you're using. For example, if you're displaying Chinese text but using a font like Arial, which is primarily designed for Western characters, the text might not render correctly.
Solution: Downloading a Supported Font
To ensure proper display, you should download and install a font that supports the specific language you need.
If you're unsure where to find safe and reputable fonts, here's a helpful website:



[…] 【Renpy Guide#002】 Beginner Friendly Ren'py Basic Tutorial: Ren'py Launcher […]
[…] 【Renpy Guide#002】 Beginner Friendly Ren'py Basic Tutorial: Ren'py Launcher […]